Working with defects
In the previous tutorial, we learned about content types in general. We created a content type building to represent buildings in the iCL system. Now, we want to take the next step and introduce a new content type called "defect". By creating a defect content type, we can effectively track and manage issues or defects that may arise in buildings.
In this guide, we will walk you through the process of creating a defect content type, linking it to the building content type, and creating defect instances for individual buildings. By the end of this tutorial, you will have a solid foundation for managing defects in buildings using the iCL system.
Before you get started, read the previous guide about general content types and check our knowledge base articles about content types. This guide builds on the knowledge provided in these articles.
We will continue working on the building inspection workbook from the previous guides,
💾 you can download if from here.
Create a defect content type
In the iCL system, we distinguish between general content types (e.g. building), and defect content types. In addition to the basic set of properties, defect content types define an object to which they belong (called "parent") and the state in which they are currently (like: open, in progress, resolved).
Let's create a defect content type that belongs to the building content type that we already created.
The beginning of the JSON file is very similar to the building content type definition, however in this case we do not define 'canBeInspected', but we have a 'builtinTypeId' and it's set to 6. If you don't know why, read the knowledge base article here.
  "$type": "contentType",
  "name": "defect",
  "displayName": "Defect",
  "builtinTypeId": 6,
  "titleFieldName": "defect_title",
  "icon": ""
Let's define the 'fields' now. We need a title, optionally a photo and a description of the defect, and the parent and state, as mentioned above.
"fields": [
  {
    "$type": "contentField",
    "name": "defect_title",
    "displayName": "Defect title",
    "isRequired": true
  },
  {
    "$type": "contentField",
    "type": "FileEntry",
    "name": "defect_photo",
    "displayName": "Photo"
  },
  {
    "$type": "contentField",
    "type": "LongText",
    "name": "description",
    "displayName": "Description"
  },
  {
    "$type": "contentField",
    "type": "ContentItem",
    "name": "building_ct",
    "displayName": "Building",
    "isRequired": true,
    "builtInField": "ParentContentItemId"
  },
  {
    "$type": "contentField",
    "type": "Number",
    "name": "status",
    "displayName": "Status",
    "builtInField": "Status"
  }
]
Note, that the 'type' of the field that stores the building is ContentItem and it has a property 'builtInField' set to ParentContentItemId.
This tells the iCL System, that our defect content type is a child of the building content type, allowing us to load it into the checklist later.
Also, the value of 'builtInField' of the last field is Status, which tells the iCL System to use this field for any status-related functionalities.
After the 'fields', we have to define 'relationships' as well. Here, we specify the relationship between the defect and the building. Make sure to use the id of the building content type here!
"relationships": [
  {
    "$type": "contentRelationship",
    "name": "buildingrelation",
    "displayName": "Building",
    "foreignKeyField": "building_ct",
    "targetContentType": {
      "$type": "contentTypeRef",
      "id": "216bf3e2-a3a1-4941-9e58-dccf79f2038b",
      "version": 1
    }
  }
]
Let's see the whole defect content type definition JSON.
{
  "$type": "contentType",
  "name": "defect",
  "displayName": "Defect",
  "builtinTypeId": 6,
  "titleFieldName": "defect_title",
  "icon": "",
  "fields": [
    {
      "$type": "contentField",
      "name": "defect_title",
      "displayName": "Defect title",
      "isRequired": true
    },
    {
      "$type": "contentField",
      "type": "FileEntry",
      "name": "defect_photo",
      "displayName": "Photo"
    },
    {
      "$type": "contentField",
      "type": "LongText",
      "name": "description",
      "displayName": "Description"
    },
    {
      "$type": "contentField",
      "type": "ContentItem",
      "name": "building_ct",
      "displayName": "Building",
      "isRequired": true,
      "builtInField": "ParentContentItemId"
    },
    {
      "$type": "contentField",
      "type": "Number",
      "name": "status",
      "displayName": "Status",
      "builtInField": "Status"
    }
  ],
  "relationships": [
    {
      "$type": "contentRelationship",
      "name": "buildingrelation",
      "displayName": "Building",
      "foreignKeyField": "building_ct",
      "targetContentType": {
        "$type": "contentTypeRef",
        "id": "216bf3e2-a3a1-4941-9e58-dccf79f2038b",
        "version": 1
      }
    }
  ],
  "id": "86dc8088-520f-4f2b-9b09-c9578c2f16e7",
  "version": 1
}
Let's upload it to iCL Portal! Follow the steps from the previous tutorial.
In iCL Portal, defect content types are marked with a little bug symbol in the 'Base type' column.

Import the content type to the workbook
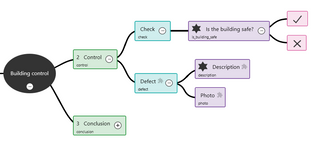
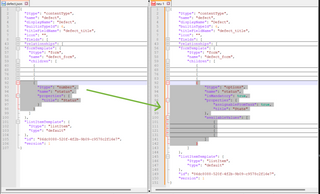
In order to make this tutorial easier to follow, we will ignore that buildings may have multiple floors which have individual defects. We will assume that the building is a single entity and we will check it as a whole.
We need the following changes:
- make the chapter 'Control' not repeatable,
- clear the chapter's title script (by right-click and 'Delete'),
- in the 'Check' headline, remove the 'Floor' field,
- rename the question "Is the floor safe?" to "Is the building safe?",
- and lastly, delete the "Is it very dangerous?" question from the 'Defect' headline and also the 'Exist' script from the photo field where the field was used.
This is a very simplified scenario for the sake of demonstration. Of course, in more complex scenarios (e.g. inspecting each floor separately), it's also possible to create and maintain defects. In this case, we recommend to create a floor content type (which belongs to the building), and the defects should belong to the floors then.
Create the content item field
Let's enhance the workbook with our new content type. First, import the JSON file to the workbook.
We already have a 'Defect' headline in the workbook, let's expand it a bit to be able to create defect content items. We will add a new content item and text field to it.
The content item field should:
- be readonly,
- have 'Automatic creation', 'Automatic updates' and 'Auto fill' selected, and
- specify the mappings correctly.
'Automatic creation' allows you to create content items of the selected type when the inspection is completed in iCL Filler. This way, we can register new defects during an inspection.
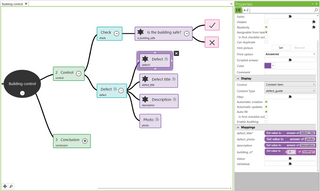
Note that in the parent mapping (building_ct), we use the id of the building content item.
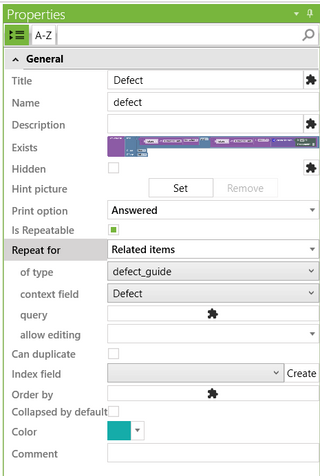
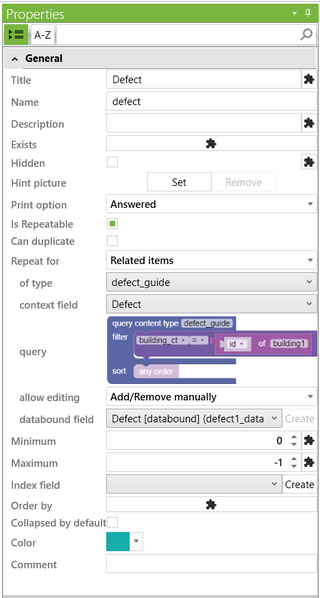
Add the state field
We need one more field in the 'Defect' headline for the state of the defect.
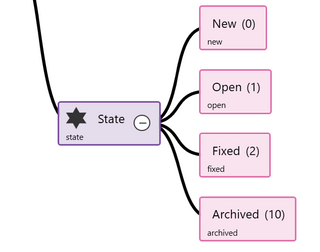
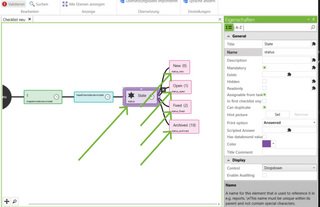
The state of the defect must be a number. However, we cannot just create a number field here, because then how would the users know what to enter, which number means what? Instead, we create a radio button (a radio button allows the user to choose only one of a predefined set options).
Usually, a defect has the following states: new, open, fixed and archived. Let's create a radio button with these options.
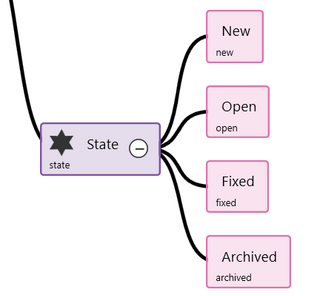
The only problem is now that these are not numbers, so we cannot use it (yet) in the status field of the content item.
In iCL Designer, by multiple choice questions, you can specify titles and values for the answers. Titles are shown to he user in iCL Filler, but the values can also be used in scripts. Read more about values and titles here.
So we can set numbers as values for the options.
You can use any number for status, but keep in mind that defects with a state above 9 will not be shown in iCL Filler when existing defects are loaded.
The best practice is to use numbers between 0 and 9 for states like new/open/fixed, and use 10 for archived.
The mapping for status should be the following:
Create answer scripts
Just like in the previous guide, we will now add scripts for the answers of the fields defect_title, description, photo and state. Use the defect1 content item field in these scripts.
The 'Scripted Answer' of the defect_title field should be:

The script for description and photo are very similar to this.
However, the 'Scripted Answer' for the state field should be a bit more complex. If a defect already exist, we should load its state, but if it's just created then the sate should be automatically set to 'New' (which has a value of 0). To add this script, we need to learn first, how to load existing defects.
Loading existing defects
A building can have multiple defects. When a building is inspected, the inspector should see all existing defects and (s)he should be able to add new ones too.
First of all, we have to make the 'Defect' headline repeatable. This will allow the users to manually add new instances of this headline, which will create a new defect for each headline, because we selected 'Automatic creation'.
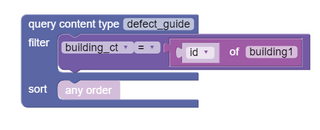
To load all existing defects, we need the 'Repeat for' property. In this case, we use the 'Related items' option.
We want to repeat the headline for all items of type defect which belong to the building that is currently inspected. For this, we use the 'query'. The following script will do the job:
To allow both repeating for existing items and adding items manually, select 'Add/Remove manually' in the 'Allow editing' property. For this to work, a databound field is necessary, click 'Create'.
The created databound yes/no field indicates whether the headline was automatically created (for an existing defect), or manually added by the user (to create a new defect).
If the headline is created automatically, the value will be 'Yes', otherwise 'No'.
This information is used by the system to prevent users from removing headlines/chapters that were created automatically. Even if "Add/Remove manually" is configured, a user can always only delete those headlines/chapters that (s)he manually created.
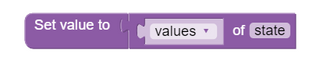
With this new field, we can now add the answer script for the state field:

There is only one last thing that must be changed in the workbook: currently, the 'Defect' headline only exists if the answer to the "Is the building safe?" question is false. By a building, that is inspected for the first time, it can work. However, when reinspecting a building that has existing defects, those should be loaded no matter that you answered the question or not. Let's delete the 'Exist' script of the 'Defect' headline.
We finished the workbook. Upload it to iCL Portal.
You can download the icl file from here.
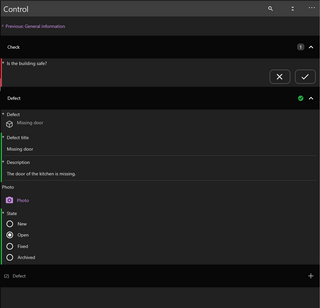
Let's see all this in iCL Filler
Start a new inspection, select the inspected building. Then, navigate to the 'Control' headline and choose the option that the building is not safe.
Add a 'Defect' headline by clicking the + icon. The state of it will be automatically set to 'New'.
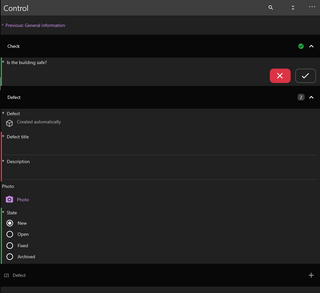
Note, that you can add as many defects as you want.
Let's fill in the title and the description, then complete the inspection.
Note, that the item will be created only after the inspection is completed! This is for a reason:
Before completing an inspection, you can change the data in the checklist as you wish - and as the checklist allows. You can even cancel an inspection, effectively deleting the data in the checklists. Changing content items live would be a bad idea, because you could accidentally delete or corrupt data.
For this reason, changes to content items are only applied when the inspection is completed.
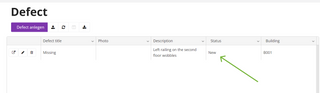
Find the defect in iCL Portal
Go to iCL Portal, navigate to the list of defect content items. You should find the newly created item there. Notice, that the state is displayed as a number.
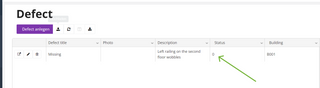
This leads to two problems:
- First, it will be hard for the users to remember which number represents which state
- and secondly, allowing your users to enter plain numbers can cause them to enter incorrect data (i.e. some number that is not representing a state)
In order to remedy this, let us change our defect content type so that it shows the state name and a pre-populated dropdown in the edit form.
Change the status field to display the status name
To do this, we will do a little hack: We will use iCL Designer to create the UI definition we will use in our defect content type.
First off, start iCL Designer and create a new workbook. Add a checklist with some blank chapter and headline.
Then copy the field 'state' and paste it into the blank headline of the new checklist. For this to work, the name of the content type field must match the name of the checklist field. Since the defect's field is named 'status', let us rename the checklist field to 'status' too. Also, ensure to prefix all available value's names with 'status_' just to be sure their name is unique.
Now save the workbook and let us extract this UI definition.
First, change the extension from .icl to .zip and extract the archive.
Then, in the subfolder iclx\form\xxxx.json you will find the form's/checklist's UI definition.
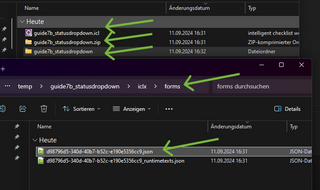
Open it with a text editor copy and paste it into a JSON editor like this one Then, find the definition of our checklist field 'status' and copy it.
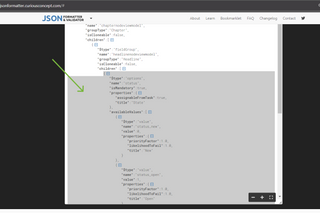
Finally, download the 'defect' content type definition from iCL Portal and open it with your favorite text editor.
Please ensure that you do not use your local 'defect.json' but download it from iCL Portal, since the latter will include the formTemplate we are about to edit!
Find the formTemplate section and in it the field definition for status and replace it:
Now upload your changed content type to iCL Portal and hit F5 for the page to be reloaded.
Navigate to the list of defects and you now can see the state as 'New'.
Go ahead and use the edit form to change the defects state from 'New' (0) to 'Open' (1).
Re-inspect the building
Imagine that a month has passed and it's time to reinspect the building.
Synchronize, then start a new inspection with the same building. If you now navigate to the 'Control' chapter, the existing defect should already be loaded with 'Open' state.
If the defect is still there, you can leave it untouched, or add a picture of the current state, or change the description, etc. Otherwise, if the issue has been fixes, change its state to 'Fixed'.
You also can add new defects, if necessary.
Conclusion
By following this guide, you have gained a solid understanding of how to effectively manage defects in buildings using the iCL system. You now have the tools and knowledge to create and track defects, ensuring that issues are promptly identified, addressed, and resolved.
We hope this guide has been informative and has equipped you with the necessary skills to efficiently manage defects in the future.
If you feel like you understand what you've learned here and are ready to test your knowledge, change the workbook back to handle defects floor by floor and manage the defects like that.