Plans
In iCL Filler, users can use plans to locate defects and other objects. This allows to easily navigate through the building and to find the objects that need to be inspected.
Settings
A plan can be quite large, especially if it is a PDF document. This can result in devices with weaker CPUs not being able to render the plan smoothly, making it difficult or impossible to input and locate defects/objects.
With the plan rendering options, users themselves can choose between high resolution and smooth input when working with large plans.
| Plan render performance options | |
|---|---|
| Automatic | The system automatically decides per plan whether the device can display it smoothly. If not, the option Performance is selected. |
| Quality | specifies to use svg/pdf file (No pixelated display even at the highest zoom level) |
| Performance | specify to use the image (Smooth display, but pixelated at high zoom factor) |
Plan Field
In a plan field the plan itself is stored. This can be an image from the image gallery or a PDF file. In addition, a plan can be provided via content elements, and thus automatically loaded into the plan field.
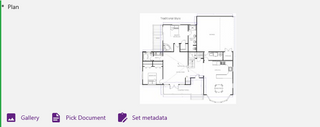
| Option | Description |
|---|---|
| Gallery | allows to pick a picture from the gallery |
| Pick Document | allows to pick a PDF document from the user's device |
| Set Metadata | after selecting a plan (either an image or a pdf), the user must specify its scale and format. With this button the saved metadata can be changed any time. |
Permitted Pdf Files
When uploading a pdf file into the iCL Filler, the pdf goes through a validation process. The app alerts the user, if the file is not compatible.
There are two possibilities, that the pdf file is not compatible.
The pdf contains only images: If your plans are png, svg or jpeg files, then there is no need to convert them into a pdf. The plan field allows to use image files.
The pdf has more than one page: We do not support PDF documents with multiple pages. Logically, a plan field should only have one plan. To fix this problem, use a programm that splits the PDF into separate files per page.
Sharing a plan with iCL Filler
On Android and iOS, it is possible to import a plan to iCL Filler by sharing it from another app. This way, you can receive a plan by e.g. e-mail and share the attachment with iCL Filler to use the plan in your inspection. When sharing a file, a banner appears that says a file is available. Additionally, every eligible plan field will show a green icon indicating that the shared file/plan can be used here. Click/tap this icon to use the plan in a particular field.
When a plan is uploaded, a window pops up to set the metadata. Notice that it is necessary to fill in the format and scale of the plan in order for the field to be considered filled-in. This is necessary, so the pins and texts can be scaled correctly for a given plan file. When filling in the metadata a preview is rendered so you can see if the sizing is correct.
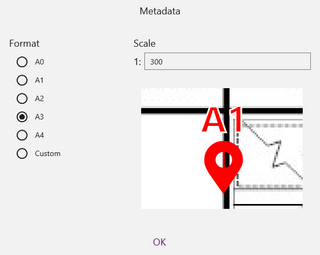
When the plan document does not give any information about its format and scale, estimate the metadata until the pin has the desired size.
Plan location field
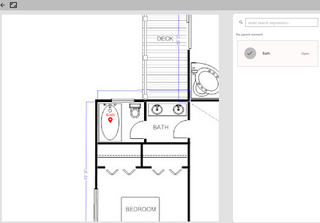
A field that stores a position in a plan.

Clicking on "Set position" opens an editor where a location can be set. Currently, there are two ways to locate an object on a plan.
- If the object has a single position (like a defect, or fire distinguisher), a pin can be set.
- Sometimes, however, you will have to mark an entire area. This can be done using the polygon tool.
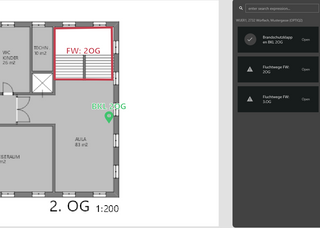
Plan view
In the inspection view, you can navigate to the list of plans relevant to the inspection via the Plans menu item.
By displaying all assigned pins and polygons, the plan view provides a detailed and informative display that helps the user navigate and work effectively with the plan.
To open the plan details, just click on the plan itself in the view.
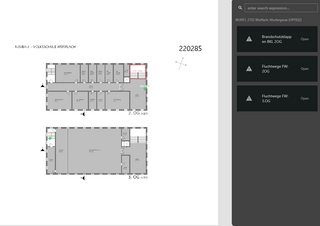
Clicking/tapping on one of the pins/poligons in the plan or on the warning icon of a list item will focus on the defect/item. Clicking/tapping on the entire item in the list view will open the checklist containing the defect/item and navigate to the defect/item.