Fields assignable from tasks
Until now, you learned how to create workbooks that can be used to start inspections from scratch. This way, however, users will have to keep track of what inspection is to be done and when. Also, when starting an inspection from scratch, every field in the checklist(s) is blank and needs to be filled in.
Sometimes, however, you already know several informations beforehand. Like, the name of the building, its address, the number of floors, the name and phone number of the customer, etc. Wouldn't it be nice if you could somehow provide this information upfront and have it filled in automatically?
With tasks you can do exactly that: plan inspections and provide additional data upfront, which is then automatically filled in the checklists by iCL Filler.
This guide will show you how this is done.
Before we start, make sure that you make yourself familiar with our task concept, see the documentation.
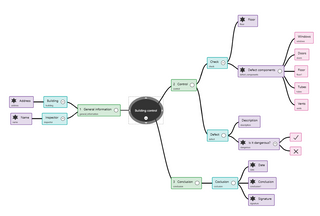
As an example, we will be using a control building workbook with just a few different questions to go over. Also, to cover more possible use cases, the "Control" headline is repeatable, (learn more about that in this guide).
💾 Download the workbook from here.
We will use this as a starting point for this guide.
Set field to assignable from task
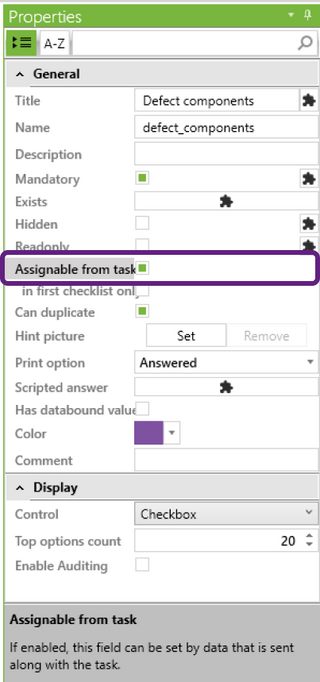
If you want a field to get its value from a task, you need to enable that functionality. Otherwise, even if the task provides data for the field, it will be ignored. Check the property "Assignable from task" and that's it. Now, every checklist field can be filled with the desired data.
You can also check the property down below, "in first checklist only". Normally, whenever you add a new checklist, the field is populated with data from the task. If you, however, check "in first checklist only", only the first checklist will be filled in. All subsequent ones will have this field kept empty.
Now, open the workbook and note, that every field, except "Description", has assignable from task enabled.
Creating tasks
Now that we configured our workbook, upload it in iCL Portal. We can create tasks with predefined values in two ways:
using the REST API, or
by uploading an Excel workbook
When creating a task, you need to provide values for certain required fields. These include a title, inspector, start date, and additional relevant information.
- API
- Excel
As for the API, we have to define the request parameter as a json.
In the json code shown below, the fields "externalId" up to "itemsInspected" are required. All other fields in this example are custom properties. You can define anything as a custom property, therefore, we are able to add the question field names and their values in order to automatically answer those questions when starting the task in iCL Filler.
  {
  "externalId": "TASK_0001",
  "title": "New Task",
  "teamName": "your_team",
  "workbookName": "tutorial_assignable_from_tasks",
  "assignedUserName": "Peter Parker",
  "description": "Description",
  "startDate": "2015-12-28T23:00:00.000Z",
  "dueDate": "2015-12-29T23:00:00.000Z",
  "itemsToInspect": [],
  "floor" : 'first floor',
  "importance_scale" : 5.5,
  "date" : "2015-12-29T23:00:00.000Z" ,
  "defect_components" : "Windows, Doors",
  "description" : "Any description"
  }
The "floor" property is a simple text field, so you can provide any string.
"importance_scale" is a number field and must be a valid JSON number.
All date fields must be provided as UTC and as valid ISO 8601 date string. Format: yyyy-MM-ddTHH:mm:ss.fffZ.
For a checkbox field such as "defect_components", just write every value that has to be checked, separated with a semi column.
As the header Control is repeatable, we can also provide multiple values for some fields, such as the field floor. If so, the app will repeat the headline for each and every value in the provided json array.
If you need exact details on how to create a task using the API, see the documentation.
In iCL Portal, go to the workbooks view and select your workbook. After that, click the small toolbar button with the Microsoft Excel logo. This allows you to download an Excel template generated specifically for importing tasks for this workbook.

The file contains a header row that displays the titles.
If you have more information about a field, just write them into the next rows. This will create repeated headlines, since we set the "Control" headline to repeatable.
Excel automatically sets the format of the fields to what it should be. So the "date" is in date format, can be provided from the local date time. The "importance_scale" format is a number. For a checkbox, write all values separated by a semi column.
After we are done writing everything into the Excel workbook, we can upload it by dragging it into the inspection view.
Starting a task in iCL Filler
Now, lets see how these tasks can be used in iCL Filler.
To begin, navigate to the tasks view and search for the specific task assigned to you and click on it to see its details.
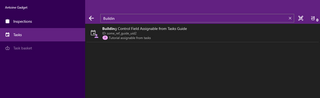
In the details view, click on the start button to create an inspection.

Notice that the fields "Floor" and "Defect components" are already filled in. "Description" is empty even though we specified the value. This is because it does not have "assignable from tasks" enabled.
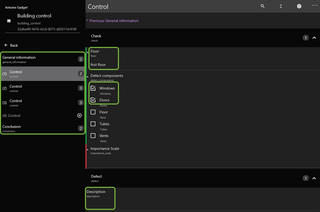
At last, we can see that the date is set.

Conclusion
You can now plan inspections for yourself and your coworkers, providing them with additional data upfront. Not having to enter already-known data repetitively makes your work much more efficient and fun! 🎉