Upgrading a workbook
In this guide, we'll be discussing how to upgrade an existing workbook to a newer version.
We'll be using the workbook that we created in the previous tutorial, so make sure you've completed that or
💾 download the workbook from here.
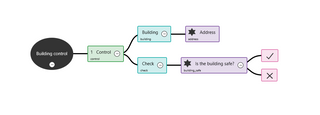
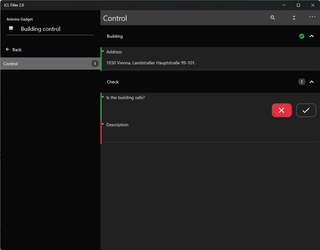
This workbook allows you to check a building's safety standards. The current state of the workbook looks like this:
Let's check the current version number of this workbook. To do so, you have to select the workbook in the Explorer on the left hand side.

If you followed the first guide and saved several times during the tutorial then your version may be higher as it increases with every save.
Adding a follow-up field
During inspections, you might come across buildings that fail to meet the standards and it would be crucial to document the details of the safety violations. To achieve that, we need to add a new field that allows you to report the details of the problem. However, this field should only exist if the inspector answers the 'Is the building safe?' question with no.
In iCL Designer you can use follow-up fields for such cases. All we have to do is add a new field as a child node of the 'No' answer.
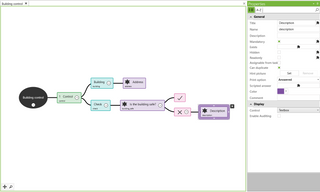
Let's introduce a second change: rename the 'Yes/No' field from "building_safe" to "is_building_safe". We will return to the implications of this change shortly.
Let's save the workbook and check the version again. It is now one more than it was before.
You can download this improved icl file from here.
Uploading the newer version
To make the new version available in iCL Filler, we need to upload it to the iCL Portal. If you completed the previous guide then you already know how to do this. If you are not entirely sure, you can check it out here.
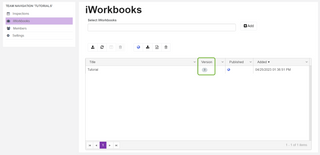
After the workbook is successfully uploaded, you'll see the new version number in the Version column.
Uploading a newer version has no effect on the ongoing inspections. From now on, when a user starts an inspection with this workbook, only the latest version will be available there, so the new inspection can only use the newest version. However, any open inspection will still use the previous version until the user upgrades it to the latest version.
Upgrading an open inspection
Launch iCL Filler and before synchronizing, start an inspection with the already existing version (or use an existing open inspection, if available), answer the questions, then synchronize.
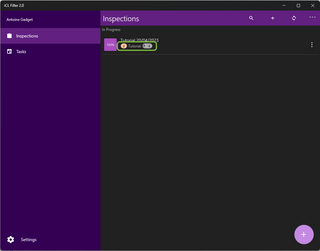
You will see in the Inspections overview that a newer version of the workbook is available, indicated by a little refresh symbol next to the newer version number.
Click the 3 dots on the right to open the context menu. You will find several options here to interact with the inspection. If a newer version is available, the 'Upgrade' option will show up here.

After upgrading, open the checklist and try it out.
Notice, that the 'Yes/No' field which was filled before has been cleared after upgrading.
It is very important to understand why this happened.
When storing a checklist, all field values are stored using their field names as key. If you change the name of a field, the app will try to find a field in the checklist with the original name (e.g. "building_safe" in our case) to apply the value, but it won't find any. Therefore this value is discarded.
If a field has been renamed in the newer version, the value of that field will be lost during upgrading!
When you now select 'No', a third question called 'Description' will appear. However when 'Yes' is selected, the third question disappears.
Troubleshooting
The new version of a workbook does not show up in iCL Filler after uploading it to iCL Portal
There are two ways to upload a workbook to iCL Portal.
- You can go to 'Teams', select the team where you want to upload a workbbok and then go to 'iWorkbooks'. In this case, you upload the workbook and that's it, it will be available in iCL Filler.
- You can also go directly to the 'iWorkbooks' page and upload the workbook there. However, in this case the workbook is not published automatically. You have to select the workbook and publish it manually. To do so, select the workbook and hit 'Publish' (indicated by a little Earth symbol).

If you cannot find the newer version in iCL Filler, make sure that you see a dark blue Earth symbol in the 'Published' column in the iWorkbooks page on the portal next to its name and version.
Conclusion
Congratulations, you have successfully learned how to upgrade an existing workbook to a newer version in iCL Designer and iCL Filler.
By following this tutorial, you can now add new fields and features to existing workbooks, ensuring that your inspections are always up-to-date and meeting your needs.