Using plans with defects
This is the second part of our plans guide. In the first one we prepared a workbook and a content type that allow us to load a building into our checklist and specify a plan for it. In this guide, we will add a defect content type and configure the workbook so that you can track defects of that building and locate them on the building's plan.
In order to understand this guide better, please read the previous guide, working with plans.
To get started, 💾 download the finished workbook from here. and the 💾 building content type from here.
1. Define a defect content type
In this guide we are assuming that you are already familiar with creating content types. If not, please check out our knowledge base.
Let us start with a very basic content type defect for representing defects.
As you can see in the following JSON snippet, we define a content type with a few fields to track the defect number, a short and long description, its status and the building it belongs to.
Then, there is the typical defect configuration:
- we define a relationship to our previously created
buildingcontent type and mapped - this points to the field
building_ctwhich is mapped to the built-in fieldParentContentItemIdand is isRequired - we also map the field
statusto the built-in fieldStatus - and finally define the
builtInTypeId6 indicating to the iCL System that this will be a defect.
{
  "$type": "contentType",
  "name": "defect",
  "displayName": "Building Defect",
  "builtinTypeId": 6,
  "titleFieldName": "defect",
  "icon": "fa-building",
  "fields": [
    {
      "$type": "contentField",
      "name": "defect",
      "displayName": "Defect",
      "isRequired": true
    },
    {
      "$type": "contentField",
      "name": "defect_number",
      "displayName": "Defect number",
      "isRequired": true
    },
    {
      "$type": "contentField",
      "type": "LongText",
      "name": "description",
      "displayName": "Defect description"
    },
    {
      "$type": "contentField",
      "type": "Number",
      "name": "status",
      "displayName": "Status",
      "builtInField": "Status"
    },
    {
      "$type": "contentField",
      "type": "ContentItem",
      "name": "building_ct",
      "displayName": "Building",
      "isRequired": true,
      "builtInField": "ParentContentItemId"
    }
  ],
  "relationships": [
    {
      "$type": "contentRelationship",
      "name": "buildingrelation",
      "displayName": "Building Relation",
      "foreignKeyField": "building_ct",
      "targetContentType": {
        "$type": "contentTypeRef",
        "id": "81d4bd07-6f42-46e0-a458-1b1aa55995d5",
        "version": 1
      }
    }
  ],
  "id": "2b61d0bf-0dbe-4910-b5fc-aee13aa99cd3",
  "version": 1
}
2. Adding the location feature
In order to be able to locate defects on a plan, we need to add a feature and a two fields to the content type.
If you ar not familiar with handling defects yet, read this tutorial.
First of, add the following two field to your content type:
    {
      "$type": "contentField",
      "type": "Plan",
      "name": "plan",
      "displayName": "Plan"
    },
    {
      "$type": "contentField",
      "type": "PlanLocation",
      "name": "location",
      "displayName": "Location"
    }
The first field is, again, of type Plan - similar to our building content type. However, in this case it will be used to store the plan that the defect is located on.
So this plan does not belong to the defect but is rather a reference to the building's plan.
The second field of type PlanLocation is then actually used to store the location of the defect on the plan.
Now, we have the fields to store the necessary information, but we still need to tell the iCL System how to use them.
For this, we need to add the planLocation feature to the content type.
This contains the configuration (field mappings and dynamic expressions) that tell the iCL System how to render a defect type on a plan.
"features": [
      {
        "$type": "planLocation",
        "planFieldName": "plan",
        "planLocationFieldName": "location",
        "displayTextFieldName": "defect_number",
        "planLocationMode": 2
      }
    ],
The snipped above tells iCL that
- the content type
defectcan be located on a plan - that this plan is stored in the field
plan - the location is stored in the field
location - that, when rendering the plan, it should show a label with the value of the field
defect_number(which is the defect number) - and with
planLocationModeset to2, we indicate that this defect can be drawn as a point or an area (polygon)
Finally, your content type should look like the following:
{
  "$type": "contentType",
  "name": "defect",
  "displayName": "Building Defect",
  "builtinTypeId": 6,
  "titleFieldName": "defect",
  "icon": "fa-building",
  "fields": [
    {
      "$type": "contentField",
      "name": "defect",
      "displayName": "Defect",
      "isRequired": true
    },
    {
      "$type": "contentField",
      "name": "defect_number",
      "displayName": "Defect number",
      "isRequired": true
    },
    {
      "$type": "contentField",
      "type": "LongText",
      "name": "description",
      "displayName": "Defect description"
    },
    {
      "$type": "contentField",
      "type": "Number",
      "name": "status",
      "displayName": "Status",
      "builtInField": "Status"
    },
    {
      "$type": "contentField",
      "type": "ContentItem",
      "name": "building_ct",
      "displayName": "Building",
      "isRequired": true,
      "builtInField": "ParentContentItemId"
    },
    {
      "$type": "contentField",
      "type": "Plan",
      "name": "plan",
      "displayName": "Plan"
    },
    {
      "$type": "contentField",
      "type": "PlanLocation",
      "name": "location",
      "displayName": "Location"
    }
  ],
  "relationships": [
    {
      "$type": "contentRelationship",
      "name": "buildingrelation",
      "displayName": "Building Relation",
      "foreignKeyField": "building_ct",
      "targetContentType": {
        "$type": "contentTypeRef",
        "id": "81d4bd07-6f42-46e0-a458-1b1aa55995d5",
        "version": 1
      }
    }
  ],
  "filteredSynchronization": true,
  "features": [
    {
      "$type": "planLocation",
      "planFieldName": "plan",
      "planLocationFieldName": "location",
      "displayTextFieldName": "defect_number",
      "planLocationMode": 2,
      "colorExpression": "#ff0000"
    }
  ],
  "id": "2b61d0bf-0dbe-4910-b5fc-aee13aa99cd3",
  "version": 1
}
Finally, upload your content type to iCL Portal.
2. Enhance the workbook
Now that the content types are defined, we can use them in our workbook.
First off, import the defect type into your workbook.
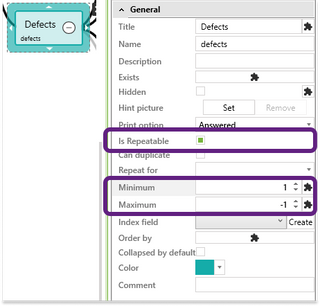
Then, next to the Plan headline, define a headline which will be used to track all existing defects of a building and allow us to locate them too. Name it "Defects" and add the following four fields:

Create the following fields
- the fields number, defect and description should be text fields
- the field defects_objects should be of type content item and should be mapped to the defect content type
- the field location should be of type plan location - we will configre this in detail in the following
As we want to track multiple defects, set the "Defect" headline to be repeatable.
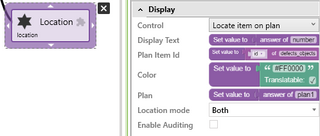
- Create a locate item on plan field.
Display Text: can be any string. This will be shown in the plan at the spot of the item/defect, so make sure the text is always short and helps the user identify the item/defect.
Plan item id: Unique id of the item that is located on the plan. The app needs this to match together an icon on a plan with the item/defect it stands for. For that reason, you should usually use the object or defect content item id.
Color: hex code string. E.g.
FF0000for red. This is typically used to color located items based on their status. E.g. an open issue is red, whereas a resolved one green.Plan: make sure to connect it with the plan field where the location should be placed. Otherwise the app does not know on which plan to actually put this located item.
Location mode: pin, polygon or both. Usually, you would go with pin since it allows you to position some defect/object at a single spot. Sometimes, however, you will want to mark areas. In this case, polygon is the solution. In case you select both, the user can decide how to mark the location on the plan.
- Create a content type field using the
defectcontent type. Map each of its fields like shown in the screenshot below.

Upload the workbook to iCL Portal.
3. Create defects
In iCL Filler, create an inspection using the new workbook and select a content item of type building.
If no content item is visible, please create one as described in the previous part of the guide
Now you can open a checklist and create several defects by adding a new headline and filling in the fields.
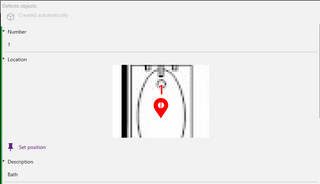
Give the defect a description and a number, then click on the "Set position" button. The plan opens and you can pin or draw a polygon on it.
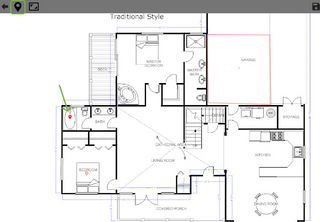
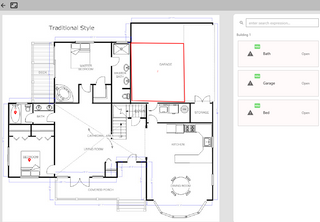
4. Get an overview over created defects
If you want to see a list of all defects, you can go to the defects list in the inspection view. Clicking on one of these new defects redirects to the headline of the checklist where the defect was created.
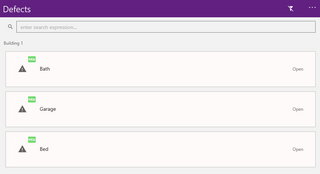
The same goes from the plan view.
Conclusion
By completing this guide, you have learned how to
- configure a content type to be locatable on a plan
- locate content items on a plan
- and how the plans are shown in the inspections view, allowing you to get an overview of all plans and located items